ic Test Blog: Christmas Blog Hop
Showing posts with label Christmas Blog Hop. Show all posts

Wednesday, December 19, 2012

It's Beginning To Look A Lot Like Christmas - Holiday Desserts & Food


It's Beginning to Look a Lot like Christmas
Holiday Desserts and Food
Hello friends! Wow I can't believe Chistmas is almost here and this is the last week of the "It's Begining to Look A Lot Like Christmas Blog Hop".  It has been so much fun!  Before I get started we would like to thank Cookin Stuff for their gracious donation to this blog hop.  Thank you so much Stacey, owner of Cookin Stuff.   If you haven't visited their website you still have time to here and, if you live locally you really need to visit their new location, you are sure to find yourself in a heaven of cookware and more. 

Now on to this weeks hop!

Each week will feature a different element of Christmas and each party will have it’s own hostess.

Nov. 28th  Life on Lakeshore Drive will host ornaments & decor.{You can still link up your ornaments and decor here}
Dec. 5th    Kathe With An E will host mantels & tablescapes. {You can still link up your mantels and holiday tables here}
Dec. 12th  House Honeys will host trees & wreaths {You can still link up your trees and wreaths here}
Dec. 19th  One More Time Events will host desserts & holiday food

Most of all, we want to thank all of you that have joined the hop
"It's Beginning To Look A Lot Like Christmas"
You all are so very talented and we've enjoyed seeing everything you've had to share!

Remember, once you link up at one of the host blogs, 
your link is visible on all four blogs!

We can't wait to see your Christmas creations!
Please grab a button to add to your post, sidebar or party page
to help spread the Christmas cheer.
Life on Lakeshore Drive
The only rule is that we ask that you follow the hostess each week! 
Just let us know you are a new follower, 
and we would love to follow you back!
 
**There will also be a Grand Prize giveaway from Cookin Stuff for those who share at all 4 parties!
All that share at all 4 parties will be entered into a drawing and the winner will be chosen using Random.org.**
{This pan retails for $64.99!}

Welcome to the evolution of Bialetti Cookware.
Our new Aeternum "EVOLUTION" line of cookware will transform cookware forever and this latest innovation will elevate your cooking experience to another level. Our beautiful "Aeternum-Evolution" line of cookware incorporates all the great benefits of our bestselling Aeternum line and takes this fantastic cookware to another level by adding even more great features.


{FYI: following is not a requirement to link. But, these ladies all have great blogs, so we would love to have you stay in touch!}

It’s also not a requirement to display the button, but if you would like to add it to your post, sidebar, or list of link parties, please feel free! The more participants in the party, the merrier!


This week we are featuring 
Holiday Desserts and Food
with 
Tammy from 
One More Time Events 
Hi Everyone, I am Tammy from One More Time Events and I am hosting this weeks party with
Holiday Desserts and Food.
There is always room for dessert right? 
This is one of the desserts I make quite often.  Oreo Pops it's easy and loved by most everyone that tries one.
It does take some time, but well worth it.
There really is only three ingredients
Package of Oreo's
Package of Cream Cheese
 Melting Chocolates
(I need to interrupt this to Thank Barbara from Dizzy Desserts for contributing the Chocolate Melts to this event.  Thank you Barbara!)
1 (16 ounce) package Oreo cookies
1 (8ounce) package cream cheese, softened
1 package chocolate melts
 ( I get mine from a bakery supply store) but you could use chocolate bark or other melting chocolates

Directions:

Using a mixer, blender or hand held mixer, mix Oreos and cream cheese together.
Roll into a 1 1/2 inch ball
Chill for an hour in the freezer.  
Melt approximately 3/4 package of Chocolate melts
Insert stick in a oreo ball and dip into the chocolate


While waiting for the balls to harden, melt about 1/4 package of melting white chocolate in a icing bag.
 Place your white chocolate in the bag and tie it off with a rubber band.
 Place it in the microwave for about 15 seconds, remove it and knead the bag of chocolates and repeat until the chocolate is completely melted. I have found this to be the best way to avoid burning your chocolates.
Snip a small tip off end of the bag (away from the food) and start decorating your Oreo balls.

I think you will find  Oreo balls are a crowd pleasing "Merry" dessert for all. 

After you make these you may find you will have some melted chocolate left, I usually do and so to use it up I like to add some nuts to it but, this time I didn't have any nuts so I used what I had on hand, which was a cranberry nut trail mix.   All you do is pour the trail mix in the melted chocolate and stir.   Scoop out about a tablespoon of the mixture and place on cookie sheet lined with parchment paper and pop in the refrigerator to harden.

Oh my goodness was this oh so yummy better than just nuts.   I was happy I didn't have the nuts this time.   I will probably make them like this from now on. The nuts and cranberry mixed together with the chocolate was delish!


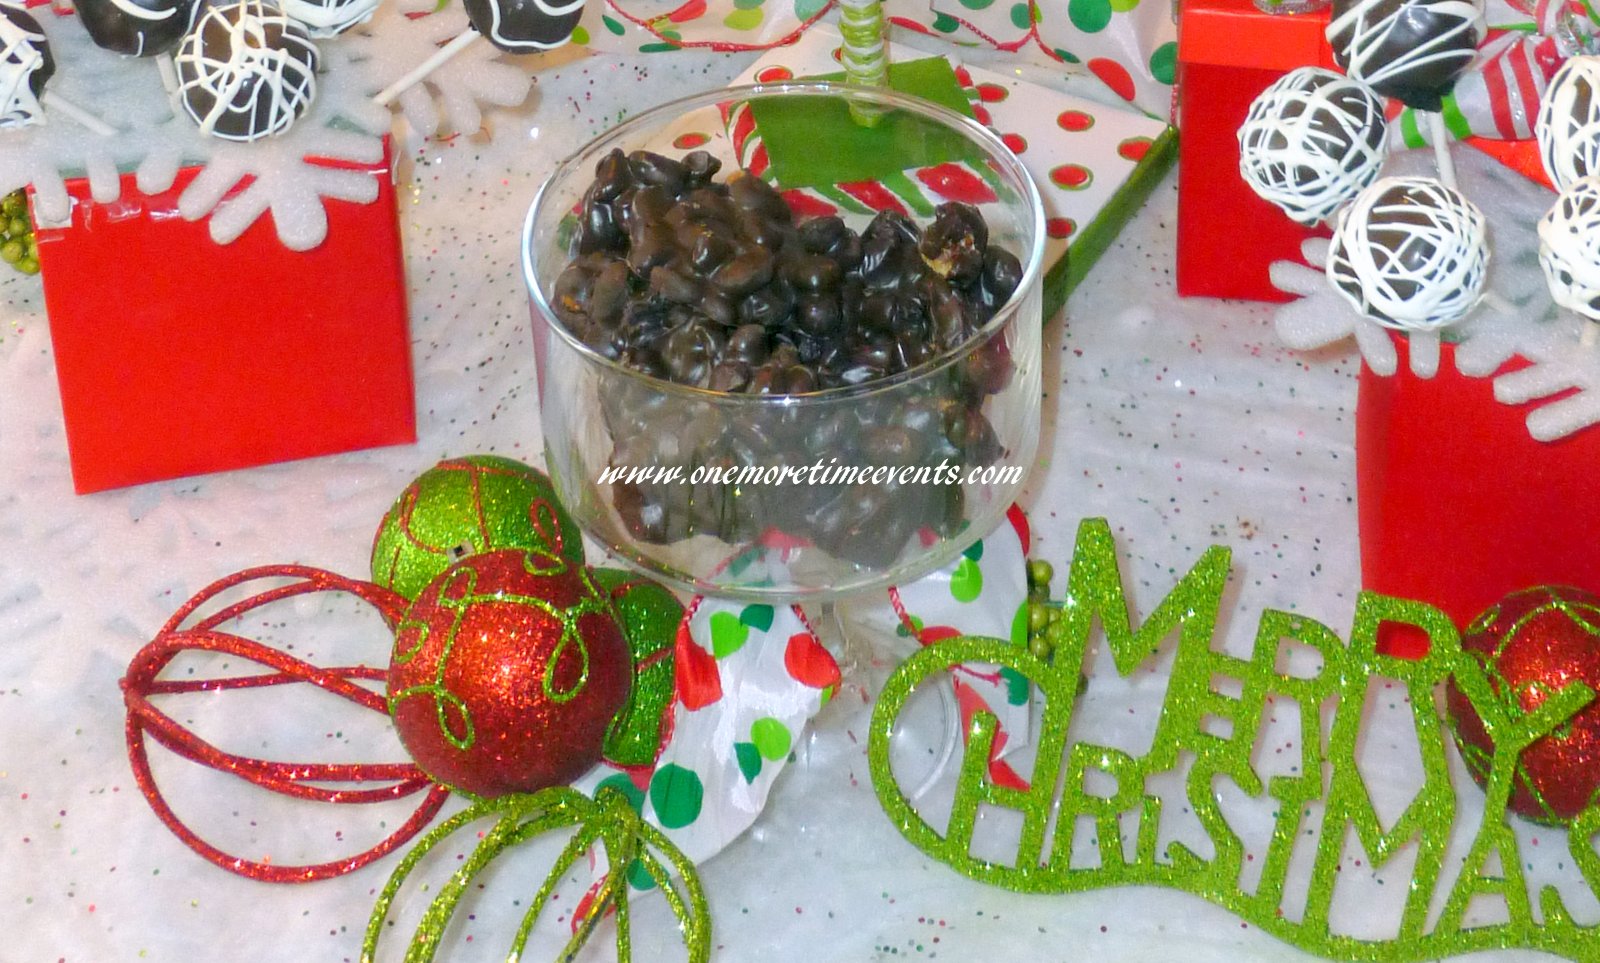
Cranberry Nut Clusters.

So I always feel that a dessert is always better when displayed...(My event planner coming out in me)

So to display the Oreo Balls  I had Mr. OMT make a wooden stand with a dowel so I could place a Styrofoam cone to mimic a Christmas Tree.


I purchased some gift boxes, a styrofoam square, foam snowflakes, clothesline,  Christmas picks and garland all from the Dollar store

After the wood stand was completed I painted the base with some red and green latex paint, making it whimsical and I added some dots of red and outlined in green.
For the tree I wrapped the garland around the styrofoam cone and then took the the clothesline and created a garland around the tree.  For the topper I add a ribbon bow, Santa (found at Walmart) and embellished with the Christmas picks .

With the boxes I added the Styrofoam squares and placed the snowflake on top and added a bow to the lid to make it look like a present.

I hope you all enjoyed the blog hop!   
I would like to wish you all a very  Merry Christmas.
XO, Tammy

Now, it's your turn!
We can't wait to see your Christmas Desserts and Food
{Please share the party button for all to see.}

We can't wait to see your Christmas creations!
Please grab a button to add to your post, sidebar or party page
to help spread the Christmas cheer.
Life on Lakeshore Drive


Posted by Picasa


Wednesday, December 12, 2012

It's Beginning To Look A Lot Like Christmas - Trees & Wreaths

This week I am thrilled to be teaming up with 

Kathy from Life On Lakeshore Drive
Doreen from House Honeys
and Tammy from One More Time Events to bring you…

It's Beginning To Look A Lot Like Christmas!

Each week will feature a differentelement of Christmas andeach party will have it's own hostess.
 
Nov. 28th Life on Lakeshore Drive will host ornaments & decor {Link up your ornaments and decor here}
Dec. 5th Kathe With An E will host mantels & tablescapes {Link up your mantels and tables here}
Dec. 12th HouseHoneys will host trees & wreaths
Dec. 19th One More Time Events will host desserts & holiday food

Once you link up at one of the host blogs, your link is visible on all four blogs.
We can't wait to see your Christmas creations! Please grab a button to add to your post, sidebar or party page to help spread the Christmas cheer.
Life on Lakeshore Drive
 
The only rule is that we ask that you follow the hostess each week! Just let us know you are a new follower, and we would love to follow you back!
**All that share at all 4 parties will be entered into a drawing and the winner will be chosen using Random.org.**
{This pan retails for $64.99!}
Welcome to the evolution of Bialetti Cookware.
Our new Aeternum "EVOLUTION" line of cookware will transform cookware forever and this latest innovation will elevate your cooking experience to another level.Our beautiful "Aeternum-Evolution" line of cookware incorporates all the great benefits of our bestselling Aeternum line and takes this fantastic cookware to another level by adding even more great features.

We hope to see you at each party!

{FYI: following is not a requirement to link. But, these ladies all have great blogs, so we would love to have you stay in touch!}

It’s also not a requirement to display the button, but if you would like to add it to your post, sidebar, or list of link parties, please feel free!. The more participants in the party, the merrier! 
This week we are featuring
Wreaths and Trees
with your hostess
Doreen from 
House Honeys
 
Hi Everyone! I'm so happy to be participating in this blog hop with these fabulous bloggers! Now grab yourselves a cuppa joe and get comfortable. You're gonna love these wreaths!

A couple of weeks ago I went with my friends Cheryl and Penny to Stockbridge, Massachusetts to help out with their annual fundraiser for the Botanical Gardens. Every year for about a week the Gardens open up this large room pictured below to volunteers who decorate wreaths, garland and/or miniature houses. The Botanical Gardens provides all the supplies and a few days later the items are sold at a fundraiser.
how to make a wreath using natural materials
I was amazed and delighted with how many supplies were available to us. Far more than I can show here. And I understand there were even more but we were helping out at the tail end of their efforts so a lot of things were already used up.
  how to make a natural wreath
The theme this year was 'natural'. Lots of burlap, pine cones, bark, acorns, moss, twigs and flowers were at our disposal. After a couple of hours, Cheryl succeeded in making three wreaths (show off), while Penny and I each made two. Here's a peek at some of the wreaths that were made by us and the other ladies who were there that day.
burlap inspired wreath
burlap ribbon wreath
decorating wreaths
pinecone wreath
birch bark wreath
There's always one rogue volunteer in the crowd. Someone should have told her the theme was natural. *la la la la* Seriously, I just figured someone had to do something different. ;) I spray painted the wreath and some twigs with silver metallic paint. It only took a few minutes to dry and then I was ready to get it decorated for its Vegas debut.
silver and gold wreath
white wreath
decorating wreaths
how to decorate a wreath with natural materials
decorating a wreath with natural materials
theme decorating for a wreath
burgundy wreath
When the volunteers were done, the wreaths were brought outside and placed on a lattice wall they had set up. There were a LOT more than you see here and they were all so pretty! I understand that for the fundraiser they sell for anywhere between $40-$100 each.
decorating wreaths
A quick look at some of the other pretties made in the days prior to our visit.
How cute is this? A little hobbit house :).
bark houses
I don't know about you, but I'm really bad at making bows. Penny, on the other hand, is a wiz. Did I mention she worked at a floral shop for many years prior to retiring? So I convinced her to give us a quick tutorial on how to make a bow because let's face it, a wreath without a bow is like Bonnie without Clyde, Ricky without Lucy, Mutt without Jeff, Ralph without Alice...ok, I'm showing my age here so I'll shut up.
So grab yourself a wired ribbon for starters. Wired ribbons are a hundred times easier to work with, and the final results are always prettier. Decide on how long you want the tail to be and pinch the ribbon tightly where the center will be as shown.
how to tie a bow for a wreath
Make a loop going upward, pinch, then make the same size loop going downward. It's important to keep the loops as close as possible to each other in size.
how to tie a bow
Continue reversing the direction of the loops and be sure to squeeze your fingers tightly around the center. DON'T LET GO!
how to tie a bow
Three loops on each side are a good place to stop. You can do more or less, but a total of six looks nice for most applications.

When you're done making the desired number of loops, twist the center tightly and tie a floral wire really tight around the center, leaving enough wire exposed to secure the bow to the wreath.
how to tie a bow how to tie a bow
It took me a while to get it right the first time. About 20 minutes! Penny advises to take your time with it. Rushing will only lead to frustration.
how to tie a bow
Don't you think this fundraiser is a great idea? I could imagine a bunch of craft/diy bloggers gathering in a space like this with all those materials at their disposal. What a hoot that would be! It was a fun day and I'm looking forward to doing it again next year.
So, which wreath is your favorite? Can you guess which other one was mine? How about Cheryl's? Or Penny's? Remember...Penny is pretty much a professional, and in my opinion her wreaths have that 'decorator' touch. So, whadaya' think?

Now, it's your turn!
We can't wait to see your Christmas mantels and tablescapes! 
{Please share the party button for all to see.}
 Life on Lakeshore Drive


Tuesday, November 27, 2012

It's Beginning To Look A Lot Like Christmas Blog Hop - DIY Christmas Ornaments

Hi, friends!
We are so excited to host a Christmas Blog Hop
to showcase your Christmas Decor.
Each week will feature a different
element of Christmas.
Each party will have it's own hostess.

Nov. 28th  Life on Lakeshore Drive will host ornaments & decor.
Dec. 5th    Kathe With An E will host mantels & tablescapes.
Dec. 12th  House Honeys will host trees & wreaths
Dec. 19th  One More Time Events will host desserts & holiday food

This week we are featuring ornaments and Christmas decor
and your hostess is
We can't wait to see your Christmas creations!
Please grab a button to add to your post, sidebar or party page
to help spread the Christmas cheer.
Life on Lakeshore Drive

The only rule is that you follow the hostess each week!  Just let us know you are a new follower,      and we would love to follow you, too!       
**There will also be a Grand Prize giveaway from Cookin Stuff for those who share at all 4 parties!**  
{This pan retails for $64.99!}
 Welcome to the evolution of Bialetti Cookware.
Our new Aeternum "EVOLUTION" line of cookware will transform cookware forever and this latest innovation will elevate your cooking experience to another level. Our beautiful "Aeternum-Evolution" line of cookware incorporates all the great benefits of our bestselling Aeternum line and takes this fantastic cookware to another level by adding even more great features.

We hope to see you at each party!


Kathy
 
Today I am sharing a quick and easy way to give a little pizzazz to your Christmas ornaments.  These would be perfect to make for gifts and create a theme for your own decor.  If you have followed my blog for very long, you know I have a love for easy projects.  I went to Hobby Lobby and loaded up on Christmas  Scrapbooking appliques.
I purchased a box of the frosted ornaments last year that I never used, so I wanted a fast way to get them ready for the tree.
It doesn't get any easier than peel and stick.  The hardest part is making sure you keep them straight.  
I also purchased a pretty set of alphabet letters.  This is a great way to personalize an ornament.
I also had some smaller clear ornaments that I used with glitter.  I added Pledge floor cleaner to make the glitter stick.
I love this snowflake applique. 
This letter came from a large bag of green and red glitter foam letters.  This one would be great for kids to decorate with on foam balls.  
I had this applique from previous projects.  
Since I put a lot of gold ornaments on my fireplace, I made of a few these using gold glitter.  
That's my quick and easy Christmas tip, now it's time to see your amazing creations!