ic Test Blog: Christmas Decor
Showing posts with label Christmas Decor. Show all posts

Sunday, December 14, 2014

Christmas Mantel Reveal

I bet you thought I was never going to share any of my Christmas decor this year didn't you!   It's been kind of a hectic season this year, but now I am ready to reveal to you today the mantel decorated for Christmas.  I will also be showing off other areas of the house that have been dressed up for the holiday over the next week so, be sure to check back in when you have time.  Or, better yet, sign up to get new posts delivered right to your email using the sign up form over on the sidebar --->>
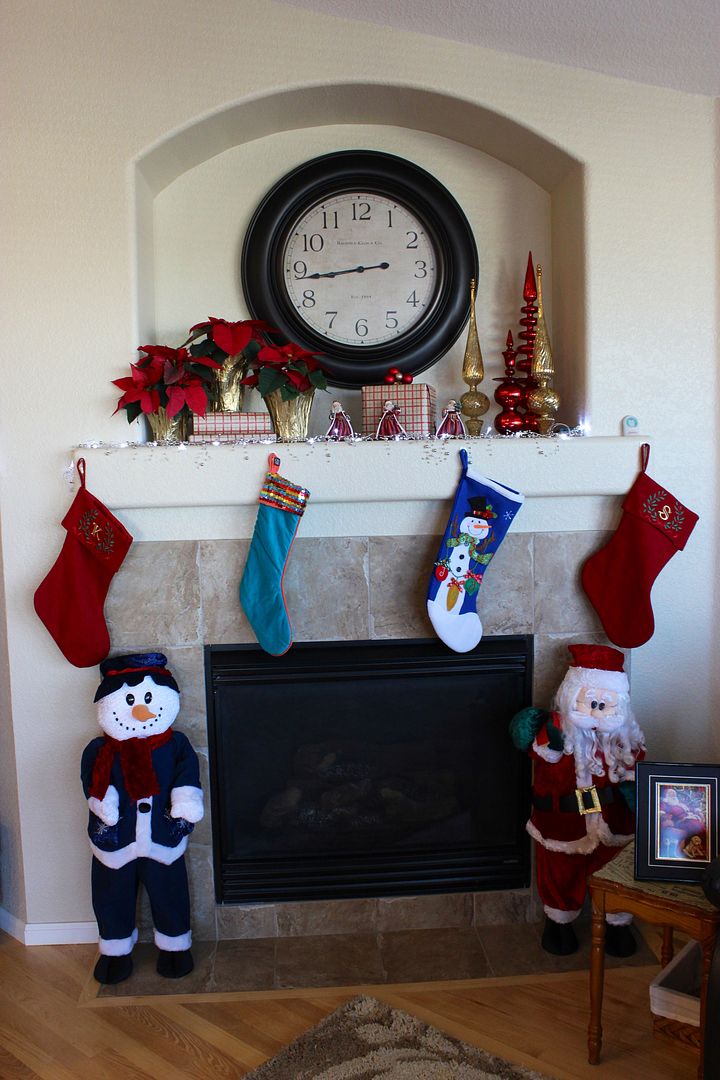
My MIL was there again to help with the details. That's her snowman stocking. She loves blue and snowmen and she now has one to hang with ours. 
We had picked up a few poinsettia plants at Lowes for .99 right after Thanksgiving and The red leaves and gold foil set our color theme for the mantel. I covered some books in gift wrap and used them to elevate one of the plants.  I have put my MIL in charge of keeping them alive because although, I can grow veggies and flowers outside, I have a brownish thumb when it comes to plants inside!
I've had these red & gold mercury glass spires for years and have used them in my holiday decor every year since.
My MIL wrapped a box in the same gift wrap and placed small gold and red ornaments on top of it.  She then added my 3 little favorite old world Santas in front of it. 
A battery operated beaded lit garland sits in the front of it all to brightened it all up at night.
To the left of the fireplace is a shelf that surrounds the TV. 
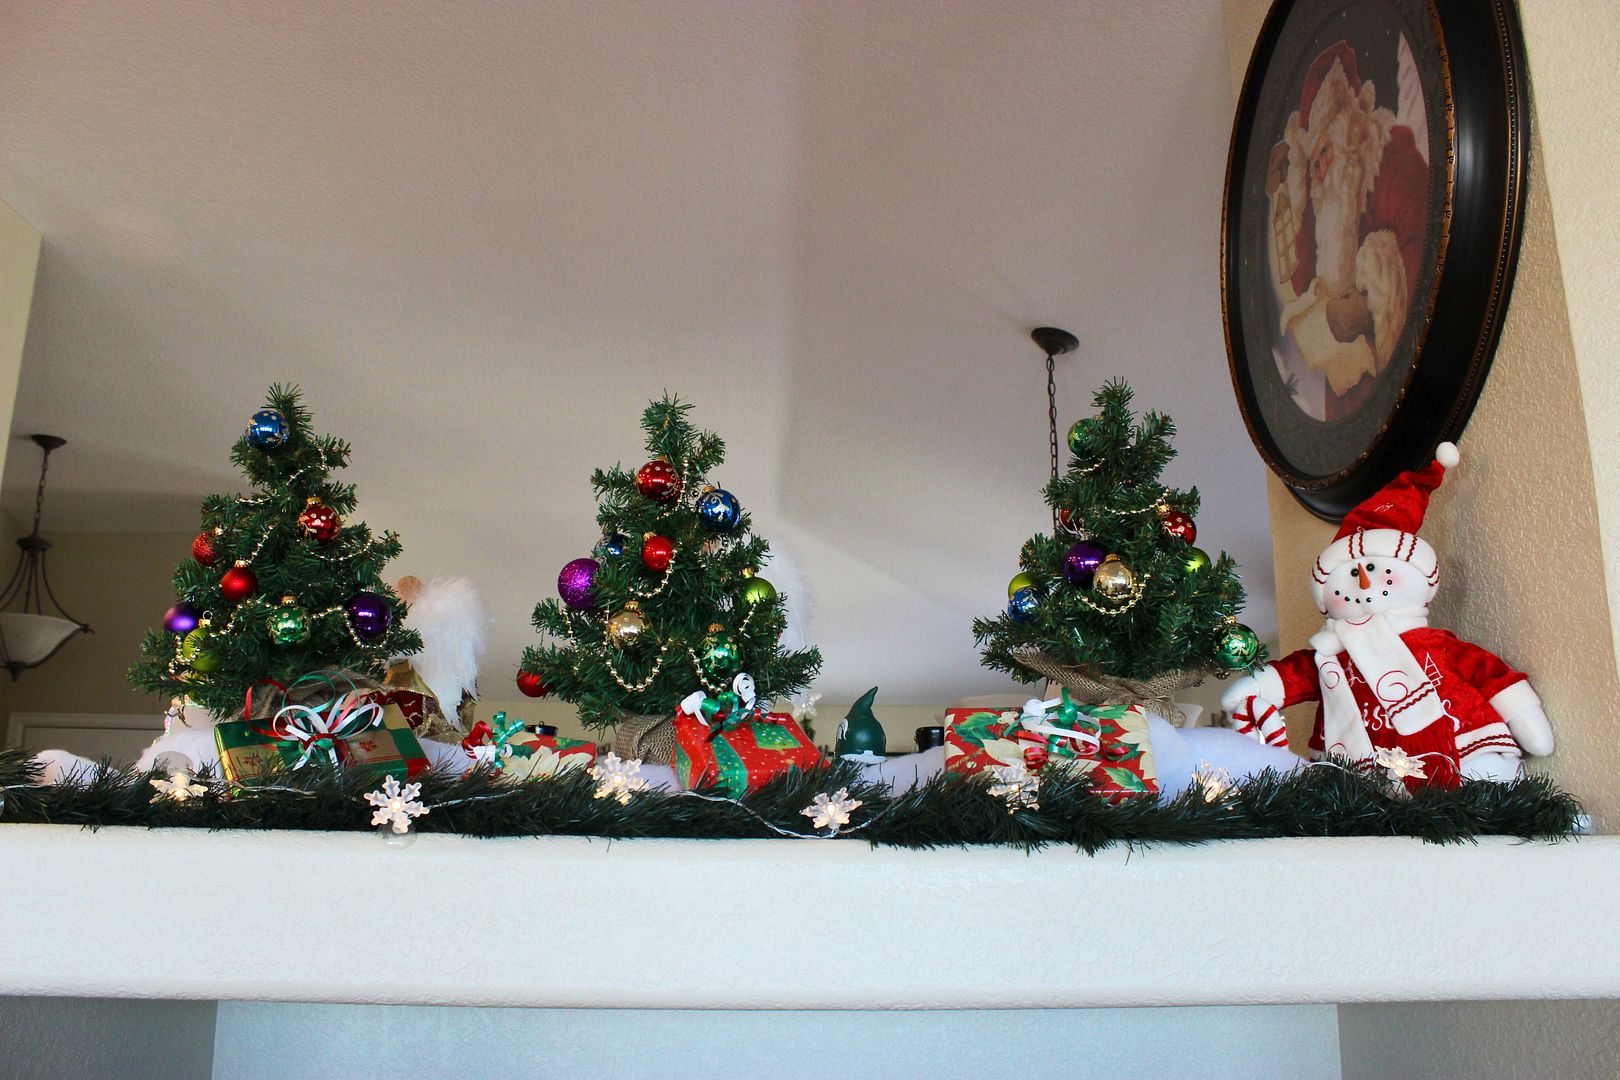
We had so much fun decorating this spot!  Even Mr. B lending his touch by adding the stuffed snowman. We had picked up the little trees at Hobby Lobby and Linda (my MIL, yes, she does have a name LOL) set to decorating them while I added white fluff and snowflake lights that I purchased at IKEA last year. We added a few wrapped boxes to add more color.
Mr. B & I agreed that the clock has to stay in it's spot in at the mantel which means my beloved Santa piece needed a new home this year.  He fits perfectly above the TV shelf!
On the dining room side of the shelf I have my angel collection along with a couple of my little nutcrackers.  Oh wait!  Stop right here!  LOL!  I seriously did not notice until just now that my Michigan State University Sparty garden gnome (a gift several years ago from my son and daughter-in-law) snuck into the Christmas decor!  LOL!  I am guessing that was Mr. B's doing!! You know what?  He staying right there!! Christmas time needs to have some fun and whimsy, am I right?

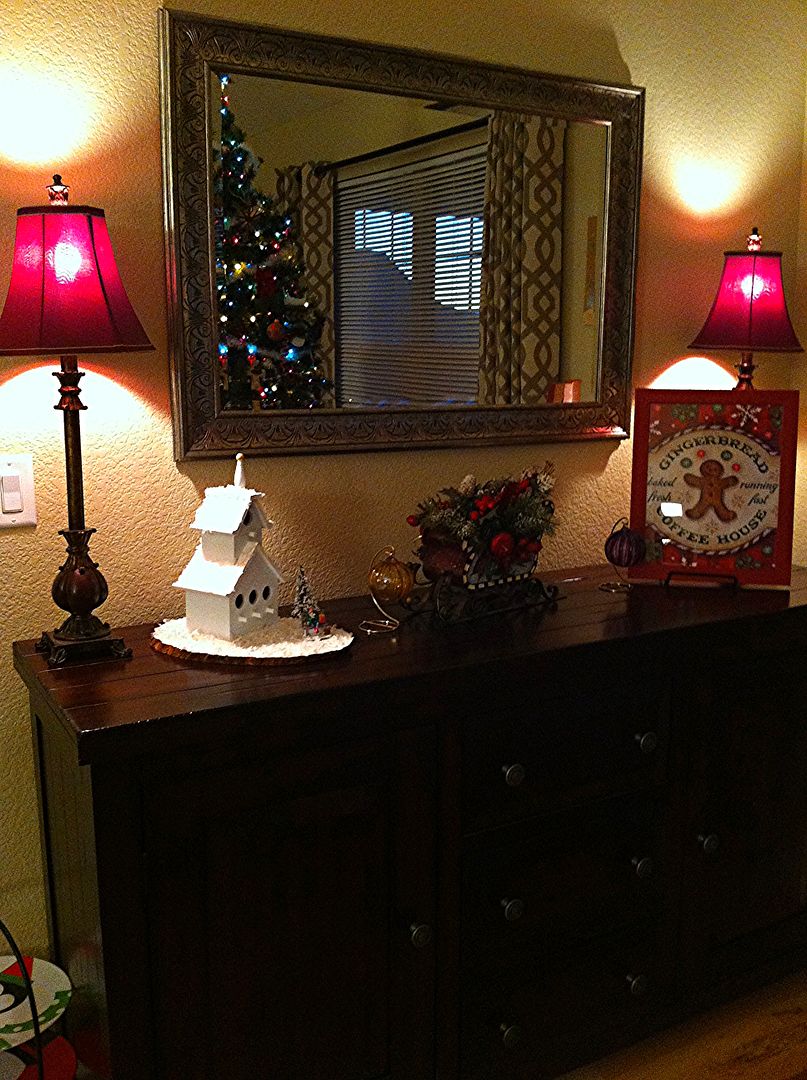
Again, be sure to stop back by as I will be sharing the china cabinet all decked out for Christmas. In fact, here's a sneak peek just to make sure you do!
Like what you see? 
Well then, follow me by email and never miss a new post
Click here to see where I may be partying this week. 
AND
Don't forget to come by on Tuesday's
for the link party.

Wednesday, December 18, 2013

Holiday Home Tour

Can you believe Christmas is just a few days away?  
Soon 2013 will be over and a new year will be greeting us!

I shared our Christmas table with you last week so, now it's time to show you the rest of our holiday decor. 

Since we are in a new home decorating this year was a challenge.  
New surfaces to cover and decisions on how I wanted to have the decor look had to be made.

Although I am happy with how it all turned out, I have decided that since I have bins of decor no longer being used, when I go to pack everything back up, only sentimental and favorite pieces will stay and the rest will be sent off to be re-loved in a new home.  

Until then, Let me take you on a tour of our home for the holidays.
First up is the mantel and fireplace area.


Pretty much everything here will stay. I love Santa and the mantel is a perfect place to display my favorites. You can see the Santa picture above the buffet at our previous home here
At night, the lights I used on my New Year's Eve tablescape come on and add the perfect amount of holiday sparkle! I love that they are on a timer so they turn on and off on their own.
There are four stockings hung, mine, Mr. B's, Max's and one for Mr. B's mother who will be spending the holiday with us this year.
Next up is the space above the TV.  It divides the living room/ kitchen and the dining room and is pretty deep.  I decided to split down the middle and decorate one side for the living room and the other for the dining room. 
This is the living room side and my angels keep watch over us. 
The angels usually sit up on the top of my china cabinet but the space isn't as tall in this house and I like that I can see and enjoy them here.
On the dining room side I have my small collection of nutcrackers, a stuffed snowman and the Joy sign.  I'm not sure what, if any, of these items will stay or be re-loved. 
Sorry for the poor quality of this photo.  4 months in and I still haven't figured out the lighting in this house LOL! We had to buy a new tree this year as our old one blew out a string of lights and after a few days of trying to fix it, Mr. B gave up and bought a new one. Only one tree will work in this house so no more fun for me in decorating our white one (seen here and here). Mr. B is in charge of the tree decorating and he loves a warm homemade feel and I think he does such a great job placing all of the ornaments and other decor on the tree!


On to the buffet. I kept it very simple this year.
I did change out the lampshades to the burgundy ones for the season.
I purchased this sweet Gingerbread piece at my very first trip to a Christmas Tree Shop when I was visiting my grandson in CT.  My friend Kathleen always finds such cute items there that, when I found out there was one near my son's home, well I had to make them take me there LOL! The ornament is a gift that is becoming a yearly tradition from my son and his fiancee.  It is from a glass shop in RI and is hand blown. 
I received the yellow ornament as my gift this year! It sits between a tin sled filled with holiday picks and the little winter church I crafted a month or so ago.
The doors to my office are one of the first things you see as you enter the front door so, of course, they had to get into the holiday spirit!
I purchased a pair of white wreaths and picks on sale at Michael's and hung them from the doors with ribbon held on with Command Strips (Command Strips are my new BFF's! There isn't a spot in the house that doesn't have something hung or hooked with one!).
A little pillow with a shout out to Santa hangs from the handle.


So there it is, a holiday tour of our new home all decked out for Christmas!
Mr. B and I wish all of you a very Merry Christmas and a Happy New Year!
I look forward to all that the New Year brings!


Click here to see where I may be partying this week.
AND
Don't forget to come by on Tuesdays
for the link party.

Wednesday, December 12, 2012

It's Beginning To Look A Lot Like Christmas - Trees & Wreaths

This week I am thrilled to be teaming up with 

Kathy from Life On Lakeshore Drive
Doreen from House Honeys
and Tammy from One More Time Events to bring you…

It's Beginning To Look A Lot Like Christmas!

Each week will feature a differentelement of Christmas andeach party will have it's own hostess.
 
Nov. 28th Life on Lakeshore Drive will host ornaments & decor {Link up your ornaments and decor here}
Dec. 5th Kathe With An E will host mantels & tablescapes {Link up your mantels and tables here}
Dec. 12th HouseHoneys will host trees & wreaths
Dec. 19th One More Time Events will host desserts & holiday food

Once you link up at one of the host blogs, your link is visible on all four blogs.
We can't wait to see your Christmas creations! Please grab a button to add to your post, sidebar or party page to help spread the Christmas cheer.
Life on Lakeshore Drive
 
The only rule is that we ask that you follow the hostess each week! Just let us know you are a new follower, and we would love to follow you back!
**All that share at all 4 parties will be entered into a drawing and the winner will be chosen using Random.org.**
{This pan retails for $64.99!}
Welcome to the evolution of Bialetti Cookware.
Our new Aeternum "EVOLUTION" line of cookware will transform cookware forever and this latest innovation will elevate your cooking experience to another level.Our beautiful "Aeternum-Evolution" line of cookware incorporates all the great benefits of our bestselling Aeternum line and takes this fantastic cookware to another level by adding even more great features.

We hope to see you at each party!

{FYI: following is not a requirement to link. But, these ladies all have great blogs, so we would love to have you stay in touch!}

It’s also not a requirement to display the button, but if you would like to add it to your post, sidebar, or list of link parties, please feel free!. The more participants in the party, the merrier! 
This week we are featuring
Wreaths and Trees
with your hostess
Doreen from 
House Honeys
 
Hi Everyone! I'm so happy to be participating in this blog hop with these fabulous bloggers! Now grab yourselves a cuppa joe and get comfortable. You're gonna love these wreaths!

A couple of weeks ago I went with my friends Cheryl and Penny to Stockbridge, Massachusetts to help out with their annual fundraiser for the Botanical Gardens. Every year for about a week the Gardens open up this large room pictured below to volunteers who decorate wreaths, garland and/or miniature houses. The Botanical Gardens provides all the supplies and a few days later the items are sold at a fundraiser.
how to make a wreath using natural materials
I was amazed and delighted with how many supplies were available to us. Far more than I can show here. And I understand there were even more but we were helping out at the tail end of their efforts so a lot of things were already used up.
  how to make a natural wreath
The theme this year was 'natural'. Lots of burlap, pine cones, bark, acorns, moss, twigs and flowers were at our disposal. After a couple of hours, Cheryl succeeded in making three wreaths (show off), while Penny and I each made two. Here's a peek at some of the wreaths that were made by us and the other ladies who were there that day.
burlap inspired wreath
burlap ribbon wreath
decorating wreaths
pinecone wreath
birch bark wreath
There's always one rogue volunteer in the crowd. Someone should have told her the theme was natural. *la la la la* Seriously, I just figured someone had to do something different. ;) I spray painted the wreath and some twigs with silver metallic paint. It only took a few minutes to dry and then I was ready to get it decorated for its Vegas debut.
silver and gold wreath
white wreath
decorating wreaths
how to decorate a wreath with natural materials
decorating a wreath with natural materials
theme decorating for a wreath
burgundy wreath
When the volunteers were done, the wreaths were brought outside and placed on a lattice wall they had set up. There were a LOT more than you see here and they were all so pretty! I understand that for the fundraiser they sell for anywhere between $40-$100 each.
decorating wreaths
A quick look at some of the other pretties made in the days prior to our visit.
How cute is this? A little hobbit house :).
bark houses
I don't know about you, but I'm really bad at making bows. Penny, on the other hand, is a wiz. Did I mention she worked at a floral shop for many years prior to retiring? So I convinced her to give us a quick tutorial on how to make a bow because let's face it, a wreath without a bow is like Bonnie without Clyde, Ricky without Lucy, Mutt without Jeff, Ralph without Alice...ok, I'm showing my age here so I'll shut up.
So grab yourself a wired ribbon for starters. Wired ribbons are a hundred times easier to work with, and the final results are always prettier. Decide on how long you want the tail to be and pinch the ribbon tightly where the center will be as shown.
how to tie a bow for a wreath
Make a loop going upward, pinch, then make the same size loop going downward. It's important to keep the loops as close as possible to each other in size.
how to tie a bow
Continue reversing the direction of the loops and be sure to squeeze your fingers tightly around the center. DON'T LET GO!
how to tie a bow
Three loops on each side are a good place to stop. You can do more or less, but a total of six looks nice for most applications.

When you're done making the desired number of loops, twist the center tightly and tie a floral wire really tight around the center, leaving enough wire exposed to secure the bow to the wreath.
how to tie a bow how to tie a bow
It took me a while to get it right the first time. About 20 minutes! Penny advises to take your time with it. Rushing will only lead to frustration.
how to tie a bow
Don't you think this fundraiser is a great idea? I could imagine a bunch of craft/diy bloggers gathering in a space like this with all those materials at their disposal. What a hoot that would be! It was a fun day and I'm looking forward to doing it again next year.
So, which wreath is your favorite? Can you guess which other one was mine? How about Cheryl's? Or Penny's? Remember...Penny is pretty much a professional, and in my opinion her wreaths have that 'decorator' touch. So, whadaya' think?

Now, it's your turn!
We can't wait to see your Christmas mantels and tablescapes! 
{Please share the party button for all to see.}
 Life on Lakeshore Drive