ic Test Blog: Decor
Showing posts with label Decor. Show all posts

Sunday, March 8, 2015

Making The Kitchen Mine~Before & After

When we first came to look at our house to buy, one thing I knew would change, if we bought it, was the kitchen backsplash.
How a simple coat of paint can make a world of difference in a space, and make it yours!
The painted faux stones and other "artistic" touches were so not me!
How a simple coat of paint can make a world of difference in a space, and make it yours!

How a simple coat of paint can make a world of difference in a space, and make it yours!
The house was built in 2006 but I am sure faux ivy went out of style in the 1980's.
How a simple coat of paint can make a world of difference in a space, and make it yours!
I can't even begin to tell you how dark all of this made working on the counter. It was dated, it looked so fake and it totally was not me.  It was time to make it mine!

Luckily, my MIL, Linda, was begging me for a project to do.  Plus, we were expecting another snowstorm that would keep us home bound.  So, before the snow flew, I grabbed the leftover can of paint from when we painted over the hot mess pink in the guest bedroom, had the guys at Home Depot mix us up a quart, got some primer and we were ready to freshen things up.

I did the cutting in while Linda manned the roller.  One coat of primer and 2 coats of perfectly matched paint was all it took.
  
With the taping and waiting for paint to dry it took us approximately 5 hours.  
We did all of it without telling Mr. B too.  He knew how I felt about the backsplash but I wasn't sure if he was in love with it or hated it as much as I did.  
How a simple coat of paint can make a world of difference in a space, and make it yours!
No worries!  He loves how bright and light the space looks now! Linda & I swear the room is now 2 feet wider!  It's all an illusion of course, but it totally made a huge difference in the feel of the space! 
How a simple coat of paint can make a world of difference in a space, and make it yours!
Now, I feel like the kitchen is truly my space and not the previous owner's!
How a simple coat of paint can make a world of difference in a space, and make it yours!
How about you?  Do you have a spot in your home you are wanting to make yours?  Tell me about it in the comments below.


Like what you see? 
Well then, follow me by email and never miss a new post
Click here to see where I may be partying this week. 
AND
Don't forget to come by on Tuesday's
for the link party.

Sunday, March 1, 2015

DIY Shutter From A Bathroom Medicine Cabinet

DIY Shutter From A Bathroom Medicine Cabinet Door Using Homemade Chalk Paint
Imagine my excitement a few weeks ago when I found out they were opening a Habitat Restore in my town!  OMG!  I was so excited I could hardly wait for them to open and was there just after the doors were unlocked! If you have never ventured into a Restore, go!  NOW!  And go often as the inventory is always changing.  I picked up several things on my first trip.  One was this wooden louvered door medicine cabinet.
DIY Shutter From A Bathroom Medicine Cabinet Door Using Homemade Chalk Paint
I have been on the lookout for some small shutters but have been denied ever finding any.  When I saw this medicine cabinet my motto came into play.  It is not what it is, but what it can be!  In fact, I was so excited I forgot to take a photo of the full cabinet.  I had already taken the door off and put the metal box in the recycle trash and it was on the truck before I realized my bloggy mistake! 
DIY Shutter From A Bathroom Medicine Cabinet Door Using Homemade Chalk Paint
Anywho, for the price I paid, I was more than happy with my purchase!
DIY Shutter From A Bathroom Medicine Cabinet Door Using Homemade Chalk Paint
Of course, I couldn't leave it in its dark stained state.  Plus, I have been wanting to show my MIL the wonders of chalk paint.  So, I gathered my materials and we gave it a new look.
DIY Shutter From A Bathroom Medicine Cabinet Door Using Homemade Chalk Paint
A few years ago I had transformed a thrifted nightstand with homemade chalk paint and you can find the recipe for the chalk paint in that post. I find it to be so simple to use and I love the finish it creates once you give it a coat of finishing wax. Linda, my MIL, just loved helping me and can't wait to give new life to a project of her own once she finds her own home!
DIY Shutter From A Bathroom Medicine Cabinet Door Using Homemade Chalk Paint
Once we had painted on two coats of the chalk paint and wax, and distressed some spots with a sanding sponge, I decided my shutter needed something more. So, I took a few yellowed pages from a very used dictionary I had, tore them some and glued them to the top and bottom of the shutter.
DIY Shutter From A Bathroom Medicine Cabinet Door Using Homemade Chalk Paint

DIY Shutter From A Bathroom Medicine Cabinet Door Using Homemade Chalk Paint
Complete and utter love!  
DIY Shutter From A Bathroom Medicine Cabinet Door Using Homemade Chalk Paint

DIY Shutter From A Bathroom Medicine Cabinet Door Using Homemade Chalk Paint
It is exactly what the small wall above the TV alcove needed! Total spent?  I already had the paint, plaster of paris and brushes on hand so, just $5.00 for the cabinet! My kind of thrifty decor for sure!  Remember, I said earlier I picked up "several items" at the Restore that day. You'll have to keep checking back to see what else I found to make over! You're gonna love it! 

Like what you see? 
Well then, follow me by email and never miss a new post
Click here to see where I may be partying this week. 
AND
Don't forget to come by on Tuesday's
for the link party.

Wednesday, February 18, 2015

An Oscar-Worthy After Party

This post is sponsored by World Market. All opinions are 100% my own.

I love awards season!  Always have!  As a young girl, I would pretend I was a contender and practice my acceptance speech. I'd be sure to thank all of the little people that got me to where I am today.  Of course, I couldn't forget to thank my handsome husband, David Cassidy, for all of his undying love and support! 

In honor of the last big awards show, The Oscars, I decided to set a table befitting all of the big stars for an after party at my house!

My first stop was World Market of course. The have all of the entertaining essentials needed for an award winning party!
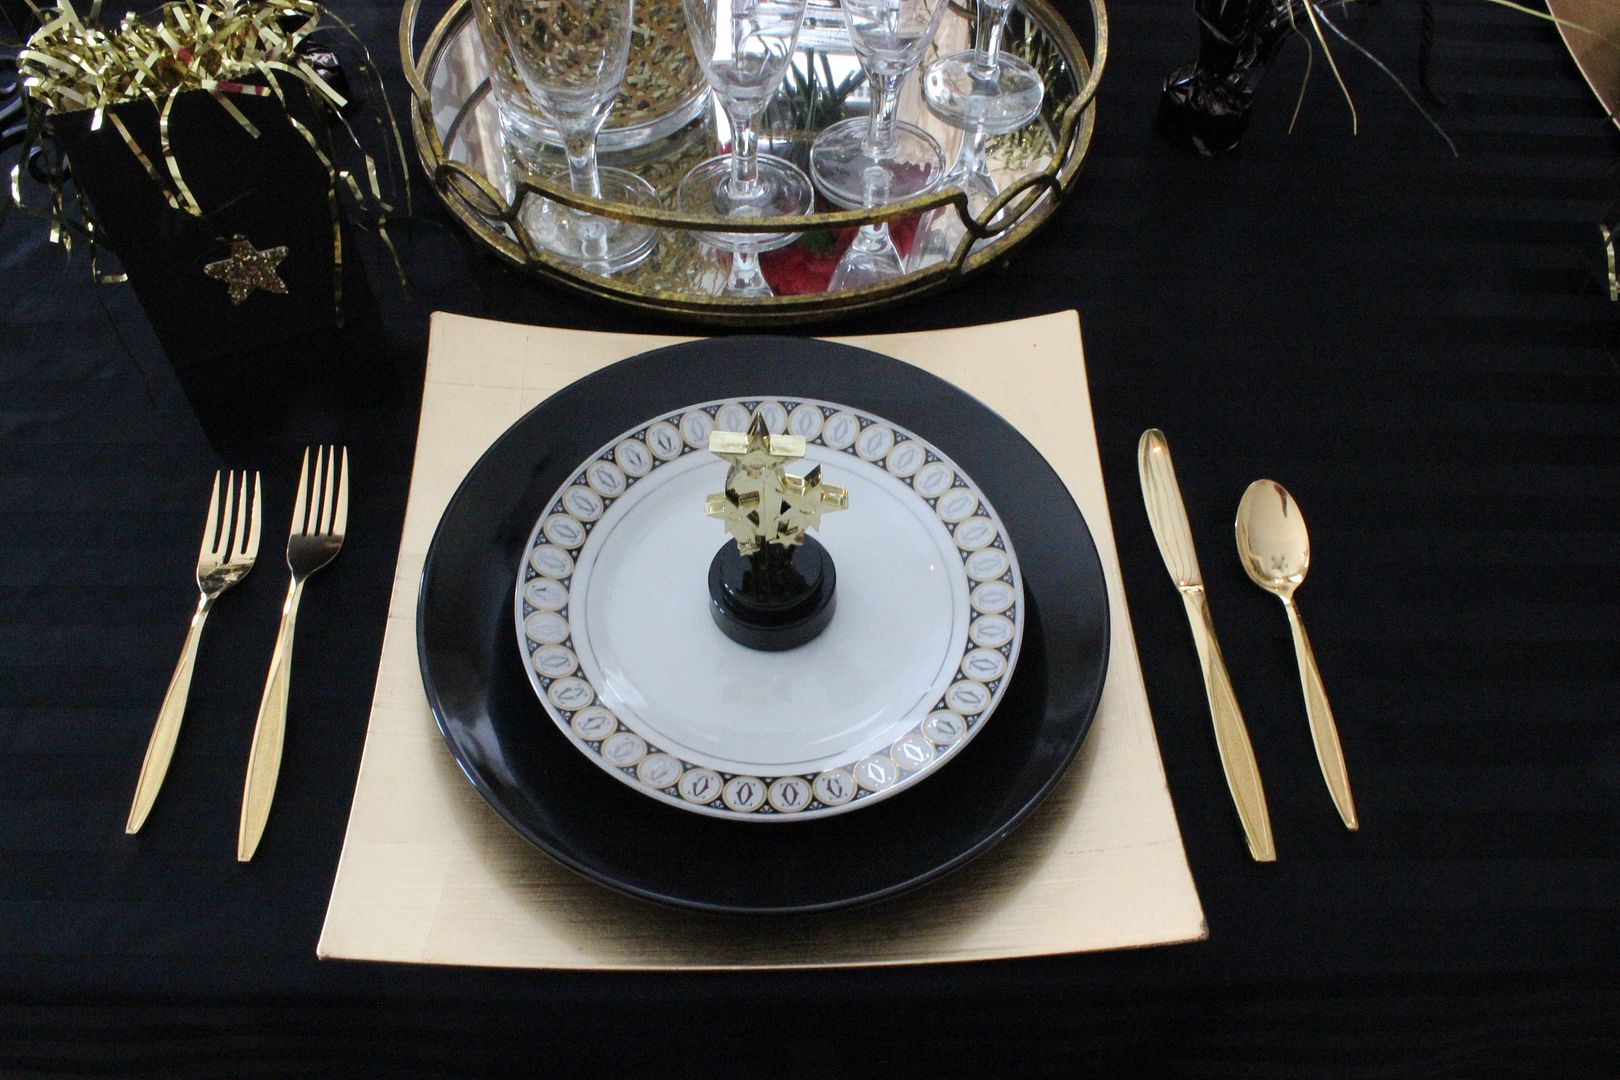
I started with my favorite black tablecloth and then added a gold square charger. Next came a solid black dinner plate and a white, gold and black salad plate. 
The design on the salad plate looks like O's, for Oscar! My vintage gold plated flatware was the perfect choice for this star studded fete!
Of course, there really are no losers on awards night at my party so, I made sure each setting had it's own statue to remind them that they are all winners!
I have been eyeing this mirrored serving tray at World Market forever and it finally found it's way home with me! 
It's the perfect piece to hold champagne glasses, an ice bucket and some sparkling wine

Some bright red flowers from the mark down section at my grocery store add the perfect amount of color.
I think these pillar candle holders bring the right amount of elegance to the table.
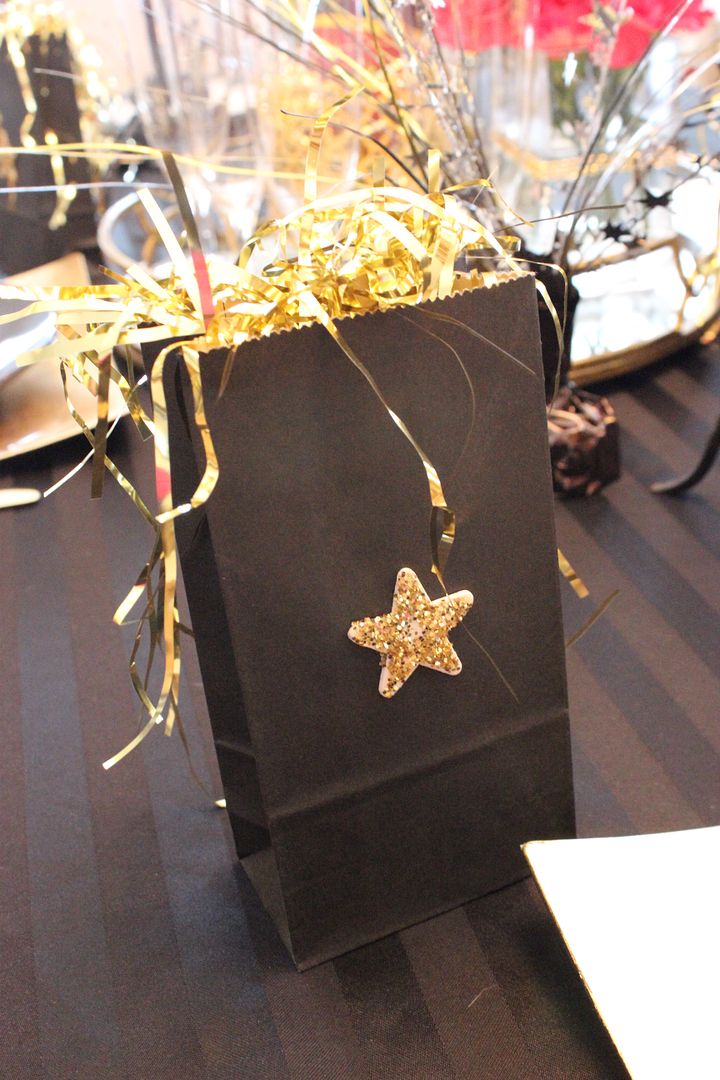
Each guest also received a gift bag, full of high end goodies and lots of sparkle.
A fun table full of glitz and glamour for my special guests to unwind after the ceremonies are over! 
If you love movies like I do, Cost Plus World Market invites you to celebrate the movie awards season and enter Cost Plus World Market’s Movie Lovers Sweepstakes for a chance to win FREE MOVIES FOR A YEAR and a $1,000 World Market Gift Card! The Sweepstakes ends 2/21/15, so be sure to hurry and enter at www.worldmarketsweepstakes.com

Sunday, February 1, 2015

Thrift Store & Estate Sale Finds

It's been a bit since I've hit some thrift stores and estate sales.  If you follow me on Facebook then you already know that this past week my mother-in-law and I took a road trip up to her favorite thrift store and that I took her to a nearby estate sale.  Today, I am sharing with you what I found!
I found the miniature Radio Flyer wagon at the thrift store. It was only $5 and so sweet.  I wasn't sure if I was going to get it out of the store as everyone that saw it in my arms wanted it too! I hung on tightly!  Then, when we went to the estate sale several days later, my mother-in-law spied this matching Radio Flyer scooter and knew I had to get it.  $4!  A steal in my book! One more Radio Flyer piece and I will officially become a collector, right?
You can see the scale of them in relation to the silver plate teapot.  Oh, the silver plate teapot!  That came from Goodwill! It was marked at $9.99 but it was 50% off so, $4.50!
This what it looked like when I bought it. Pretty tarnished for sure!  
I love the intricate details like the flower on the handle.


By placing it in with some tinfoil, baking soda and boiling water I was able to get most of the tarnish off.  
I then used some of this silver polish to finish the job.
I used the same cleaning method on these silver plated cream & sugars I got at the estate sale for $1 each!
Now, I have a beautiful, shiny, silver plate tea set.
I have always wanted a aluminum cake holder so when I saw this one at the estate sale I grabbed it. $2! I already have plans to strip the paint off.  I'll see how it looks without it and then decide if I want to repaint it.  I'm thinking maybe a sunny yellow?  What do you think?
Now, for my favorite find of the week! I left this teaser photo on my facebook page. Any guesses?
Those are bakelite handles on this 1930's Bersted toaster! I would have totally missed it if my mother-in-law hadn't spied it and showed it to me! It doesn't have a power cord but at $5 I grabbed it anyway! 
Love the art deco design of the handles! 
It is in really good shape and after my mother-in-law finished cleaning it up, it is beautiful!
I am now on the hunt for a cord as I really think it will actually toast bread!

So, there are my finds for the week!  I think I found some really unique and fun collectibles! Some may make it into a tablescape or vignette. How about you? Have you been out thrifting lately? Show me what you found in the comments below! 


Like what you see? 
Well then, follow me by email and never miss a new post
Click here to see where I may be partying this week. 
AND
Don't forget to come by on Tuesday's
for the link party.

Wednesday, January 21, 2015

Master Closet Makeover On A Budget

*I was compensated by Wayfair.com for this post with a gift card, however, all  opinions and ideas are my own*

Since I am not working, I have one day a week on my schedule where I don't clean but instead, pick a project to take on. Having only lived here a little over a year and it being a newer home, there really aren't that many "projects" but there a few. A few weeks ago, that project was our master closet. 
Master Closet Makeover On A Budget
Having a true walk-in closet is awesome!  But, it can also be a dumping ground if you don't have the right organizational tools. I was lucky enough to be given the challenge to right this wrong with some closet organizing inspiration when Wayfair.com asked me to take part in their Conquer Your Closet Campaign! And being me, I wanted to do it as cheaply as possible.

You can see by the collage, our master walk-in closet was a jumbled mess. Mr. B's shoes all sat on the floor.
Master Closet Makeover On A Budget
 And the top shelf?  
Master Closet Makeover On A Budget
Neither of us even remembered what was in the baskets and those shoe boxes should have been tossed as they were empty (found that out when I went to clear everything off the shelf).
Master Closet Makeover On A Budget
Not that my side was any neater!  I did have a shoe rack shoved back in the corner but, it wasn't big enough to hold all of my shoes so...yeah...there they are (cue embarrassment).
Master Closet Makeover On A Budget
Can you see the shoe rack now?
Master Closet Makeover On A Budget
My upper shelf was as bad as Mr. B's!  Crap just pushed up there to get it out of the way. 
Lucky me!  I get 2 upper shelves to fill with who knows what!
Master Closet Makeover On A Budget
I lied!  I get 3 shelves!  Ugh!  Time to conquer this closet!
Master Closet Makeover On A Budget
First up, I took some measurements and then went shopping.  I got two of these shoe racks from Wayfair.com that each hold up to 15 pairs of shoes. 
Master Closet Makeover On A Budget
Next were 3 of these canvas storage bins

Now to get to work! I tackled Mr. B's side first.
Master Closet Makeover On A Budget
Putting together the shoe rack was easy peasy.  A couple of whacks with a rubber mallet and it was done.  His shoes are now up off the floor and take up so little space! 
Master Closet Makeover On A Budget
So much room I was even able to move the laundry basket over by the door so it's not the first thing you see!
Master Closet Makeover On A Budget
I used the canvas storage bins for his sweaters, collectible (?) t-shirts and his sweatshirts. I plan on making up some tags so that he knows just what is in each bin. I would have loved to have taken down that bar running across the top. The previous owner used it to hang all of her purses on.  I attempted the task but...umm...the previous owners were not very handy and when trying to take the screws out I found that I would also be taking a big chunk of drywall with it.  I'm leaving that one for Mr. B to figure out. 
Master Closet Makeover On A Budget
Now, for my portion of the closet, my mother-in-law and I moved the pant rack up a few inches and moved my lingerie dresser under it. It is a much better use of space and it was her idea too! 
Master Closet Makeover On A Budget
Remember those empty shoe boxes from the before?  Well, I covered them with some blingy silver scrapbook paper I had on hand and they now hide my evening bags! 
Master Closet Makeover On A Budget
Thrifty and pretty! I even reused the purple storage bins I already had for some books etc. that I don't need to get to often.
Master Closet Makeover On A Budget
I used the rest of my existing bins on the other shelf for my sweaters and other "out-of-sight" storage.
Master Closet Makeover On A Budget
By moving my lingerie chest, I was able to use the other shoe rack for my favorite shoes.  I see I even have a spot for another pair of sandals!
Master Closet Makeover On A Budget
And, I put the shoes I rarely wear (some are for gardening or general shlepping around the house) on my old shoe holder in the corner.  It's kind of hard to tell but they are much easier to get to now! 
Master Closet Makeover On A Budget
Remember the before? 
Master Closet Makeover On A Budget
It took a few hours but I am soooo happy with the results!  The shoe racks and the canvas bins from Wayfair.com really helped to reign in the disorganization going on and kept me under my tight budget for this project.  I feel victorious in the Conquering My Closet challenge!! Be sure to visit Wayfair.com for more inspiration! How about you?  Have I inspired you to Conquer YOUR closet?